Headlight Restoration with Diamondite Clear Plastic Kit Review
April 15, 2022

I’d like to preface this article by stating that Diamondite did not sponsor or have anything to do with this post. My headlights were in terrible condition and I chose to test out this kit to see what kind of result I can get.
That is what the headlights looked like on my 7 year old Mazda 6. With the headlights in this condition my night driving visibility was severely reduced, not to mention that the headlights looked like crap while the rest of the car looked nice and shiny. It was time to get these things cleaned up. There are several options for restoring your headlights.
You can buy a headlight restoration kit, take it to a “professional”, and if you are really desperate you can even use toothpaste to restore your headlight. At the time of this writing the average cost for taking it to a “professional” is around $50 – $70. Kits cost between $20 – $40. A pack of toothpaste is free (if you brush your teeth, that is). If you have the right polishes, pads, and whatnot you can also piece together your own kit. 
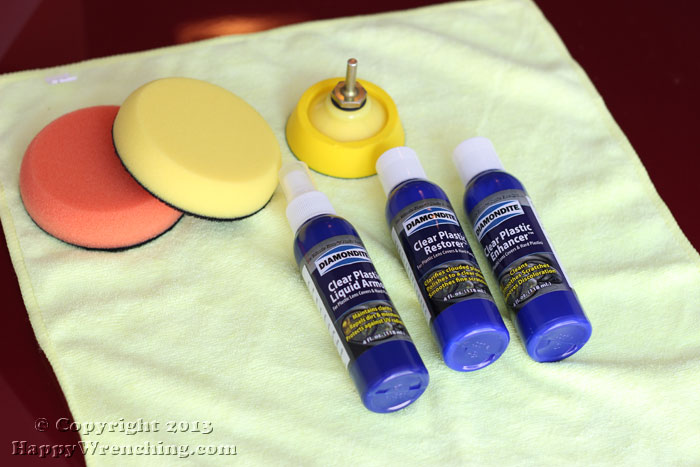
There is no way toothpaste was going to get rid of the crap on my headlight so I didn’t even bother. I hate taking my car in anywhere so a “professional” is out of the question. I don’t have right pieces for my own kit so I ended up searching for a complete kit online. Some of the more popular kits are made by 3M and Meguiars. I knew that there is no way in hell I was going to do this by hand so the kit had to work with power tools. In the end I purchased the Diamondite Clear Plastic Kit for $39.99 and had it shipped for a grand total of $46.94. I liked several things about this kit. It comes with two pads, microfiber cloth, a backing plate, and an adapter so that I can use this with my electric drill. There is no sanding required which was a big plus for me. According to the company this kit will allow you to do 3 – 4 pairs of headlights. 
Before I go any further, let me say that I am in no way affiliated with Diamondite. I just happened to try out their kit and wanted to share my results.
Headlight Restoration How To
1. You always want to wash your headlights and mask off the edges with some masking tape. 

2. Attach the backing plate and the yellow pad to your electric drill (with the supplied adapter) or rotary polisher. They say you can also use a portable drill but seeing as portable drills top out 1200 rpm I recommend using an electric drill for maximum effectiveness. My drill spins at max of 2800 rpm. Diamondite recommends 1800 rpm 
3. Spread some of the Clear Plastic Enhancer on the yellow pad in an X figure. Then, without turning on the drill, rub the pad against the headlight to smear the compound. After you have spread it out, turn on your drill or rotary polisher and start with a slow speed. Increase speed until you are around 1800 rpm. You move up and down, side to side until the compound breaks down to a clear film. When finished, you remove the residue with the supplied cloth. If your headlights are as bad as mine, you will want to do two passes. Here is the result after two passes. Not bad, at this point, all of the yellow from the headlight has been removed but there is still some haziness left over. 
4. Next step is to attach the orange pad and use the Clear Plastic Restorer. Do the same thing as before until the compound breaks down. Again, I did two passes. Here is the results. Very nice. The white haziness that you see in the picture is just the refection of the white garage walls – the actual results were great. 
5. Final step is to spray the Clear Plastic Liquid Armor on the headlights and buff it out with the cloth. The final results are below. 
Conclusion
I’m happy with the purchase and with the results. From far away the headlights look brand new. As you get closer you can still see a tiny layer that the kit could not get rid of and that is understandable since to get that deep you would need to do some sanding. I would say that the kit restored my headlights back to around 85% of their new condition. It took me about an hour and half to do both of the headlights and if you hurry up you can probably finish up in an hour. There is also enough compound left over in the bottles that I can easily do 4 more pairs of headlights. You’ll want to wash your car afterwards because as you work in the compound tiny particles will fly all over your hood and bumper. Hope this helps someone out in the future.

